Carol R. Eaton Designs

Carol R. Eaton Designs

FABRIC FOR SALE: click on pages below!

Saturday, July 28, 2012

Leaf Study

I'm truly focused on the fall with 2 upcoming solo shows; Norfolk Artisans Guild for the months of September and October and at the Kent Memorial Library during the months of November and December. I also have an opportunity to be a vendor at the Village Square Quilters November 10th & 11th! I plan to sell my stash of fabric including the ice dyed, confetti dyed and hand painted and embellished fabrics.

I've been getting up at 5:30 am to have 3 or 4 hours in the studio before I get to my desk at 9:00... I'm totally driven to be ready and "get it right"!  

I completed "Leaf Study" yesterday.

The piece is primarily silk with one piece of loosely woven linen. I made a stamp of ginkgo leaves which was used on the green strip.

The leaves were felted using wool roving.

The silk was quilted to add texture with random french knots added for interest.

Thursday, July 26, 2012

Ice Cube Dying - Think Fall Colors!

I'm getting in the mood for fall already! I just took some fabric out of the "iced" dye bath and yippee... it's fall!

The colors used in this piece were yellow, orange and green!

Wednesday, July 18, 2012

Sisters: finding inspiration in a photograph

"Sisters" was inspired by a photograph I took of Hannah and her sister Lindsey while on vacation in Maui. We were on the back side of Mt. Haleakala when we came across a beautiful stone church. The setting was so simple and peaceful we stopped to enjoy the serenity. Once I took the photo I knew I wanted to include the sisters in a design because it was such a caring scene. I live in New England and wanted the sisters to be in a more familiar setting so I decided they would equally enjoy picking apples... that's the beauty of the inspiration; you can take it in any direction you'd like!

Sisters
Hand painted background with varies dying techniques for the other fabrics.
27.5" X 12.5"

The design on the back of the jacket was created by felting wool roving.

The sisters hair was made from confetti dyed fabric.

The original photo of Hannah and Lindsey!

Monday, July 16, 2012

Felted Garden

July is a wonderful time of year with exploding colors everywhere from gardens to beach umbrellas - so much to study - so few free hours in a day!

"Felted Garden" just came back from the framers. It's a fantasy garden made up of color combinations I see in my own gardens. I love being able to take raw wool roving and plunk it down into a scene just waiting to be felted. It's fascinating having the fragile fibers become strong and permanent!

What's your favorite scene to felt?!

Tuesday, July 10, 2012

Creating Moda Batiks - The Process

Carol Chapman Britt owner of Batiks Etcetera and Sew What Fabrics shared a video produced by Moda showing the process of creating batik fabrics. For anyone interested in surface design it's a fascinating insight into the amount of work that goes into each length of fabric. The working conditions are equally fascinating... it's not pretty but it's very efficient. The video is about 16 minutes long with traditional music playing throughout so I encourage you to watch it when you can sit for a few minutes!

This is not the exact piece they create in the video
but it's similar with the over dying.

Monday, July 9, 2012

Ice Cube Dying - Weekend Results!

I had some time to play around with more ice cube dying this weekend! I've learned that the container you dye your fabric in makes a difference in the end results. I've switched back to my old standby of children's pails. The shape and size is perfect for a 1 yard piece of fabric. When using a rectangle shaped container the dye didn't meander enough for my tastes.

What type of container do you use?!


Sunday, July 8, 2012

Felting - Red Roadeshia!

I have a friend who owns a nursery in Vermont. For as long as I can remember she's been interested in landscape design and has a great eye for combing a variety of flowers to create magnificent bouquets. When it comes to finding that unique combination Trish was known for picking wildflowers from the side of the road. If she was unsure of the name of a plant she would call it a "roadeshia". The freedom to make up names inspired me to create "Red Roadeshia" which is a completely made up flower!

Using red wool roving I created the flowers with the felting technique. Each center was filled with silk gauze and quilted. The stems are hand dyed fabric with a commercial backing. It's a simple but fun design... do you have your own version of a roadeshia?


Thursday, July 5, 2012

Confetti Dying Technique and Tips

I've enjoyed developing the techniques for "confetti dyed" fabrics and feel I'm at the point where the development phase is over. That's not to say I've stopped learning because each time I try the technique I learn something new and interesting... what I mean is I can share my process and now you can start playing around! You have to promise to send photos or comments with your results though!

Let me start by telling you how I came across the idea. I was chatting with a vendor at a show who had the most luscious "straw dyed" fabrics. She explained her process which included dispersing the dye using a drinking straw. She was very open about her technique and said she too had learned by talking with people and experimenting. She encouraged me to go home and try it for myself. Let's just say I must have missed part of what she said because her technique did not work for me! I didn't like using a drinking straw and wasn't able to wear my "dust mask" while working with the dye (this is a must for everyone as the dye powder is very fine and easy to breath into your lungs). When I saw my first results to me it looked like confetti exploded across my fabric which is why I coined the technique "confetti dying".

Your must-have tools include a dust mask, protective apron, dye, latex gloves and a mesh tea strainer

1) Soak fabric in soda ash and water for at least 30 minutes
2) Spoon dye powder into mesh tea strainer and gently sprinkle dye across the fabric surface. Use even strokes to avoid clumps of dye in one area... you need a light touch.
3) Once you have the dye powder in place it's time for the real fun to begin! Below I'll explain how to get different results... if you come up with something new please share!

The fabric was laid on a flat surface and the dye powder sprinkled across the fabric. I dragged my finger through the dye creating spirals. Next I took a spray bottle filled with soda ash and water and sprayed the entire fabric surface. The spray gets the dye molecules moving and they begin to spread out and wander!  

Above is a detail shot of what I mean about the dye molecules wandering across the fabric surface. Because the dye isn't a liquid the individual molecules don't always bond together which creates residual colors!
The above picture shows the process of hanging the fabric up before spraying with soda ash and water. This is a very messy process so think about where you want to do this before you get in too deep... but messy is fun! Just as the previous description once the dye powder is sprinkled across the fabric it's time to spray with soda ash and water causing the dye to move across the fabric. 

Once you get comfortable with the process you can plan where you want to place the dye so when it runs together more colors are created.

The above patterns were created by scrunching the fabric. Again, once the dye powdered is sprinkled across the fabric and the surface is sprayed with soda ash and water you need to scrunch the fabric and leave undisturbed for at least a couple of hours.

This technique leaves more dye in the fabric than typical water immersion techniques so be prepared to spend a little extra time rinsing out your fabric before washing. I usually rinse the fabric under cold running water just to get the bulk of it out. Next I fill the sink with cold water and swish the fabric around emulating the agitation of a washing machine. When the dye is mostly rinsed I toss it into the washing machine on the hot cycle with Synthrapol... voila... you have now confetti dyed!

You can't make a mistake with any of these methods so be free to experiment!


Wednesday, July 4, 2012

Neddle Felting + Confetti Dying = A Water Lily Tablerunner

One of my favorite places to kayak is in a lagoon area off Silver lake. I call it "dragonfly world" because there are more dragonflies in that one area than you could ever imagine - it's amazing! You can even hear their wings vibrating; they sound like paper tearing. There are also a ton of beautiful water lilies and I really wanted to recreate the feel of the lagoon and turn it into a table runner.


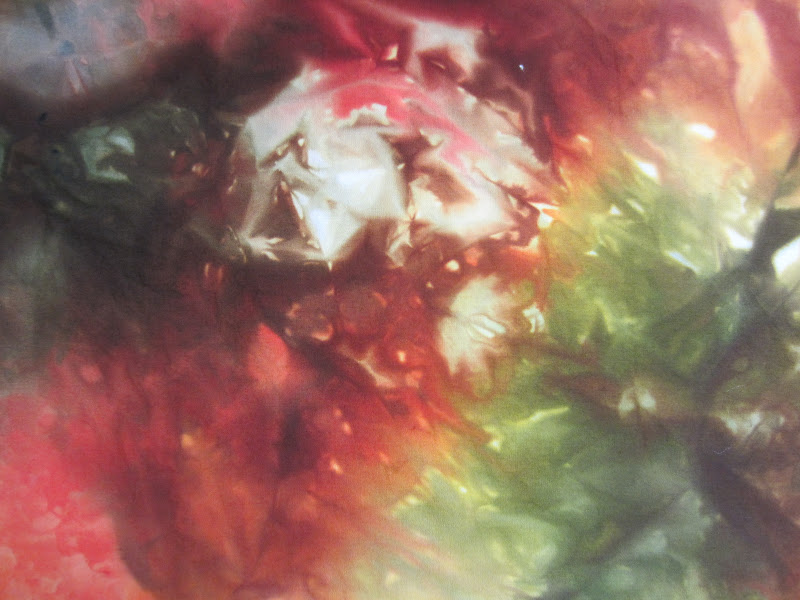
The first task was to create the lily's and leaves. I used the needle felting technique which is demonstrated in the photos below...


Here are the finished lily's and leaves. I added a few beads to the center of each flower.

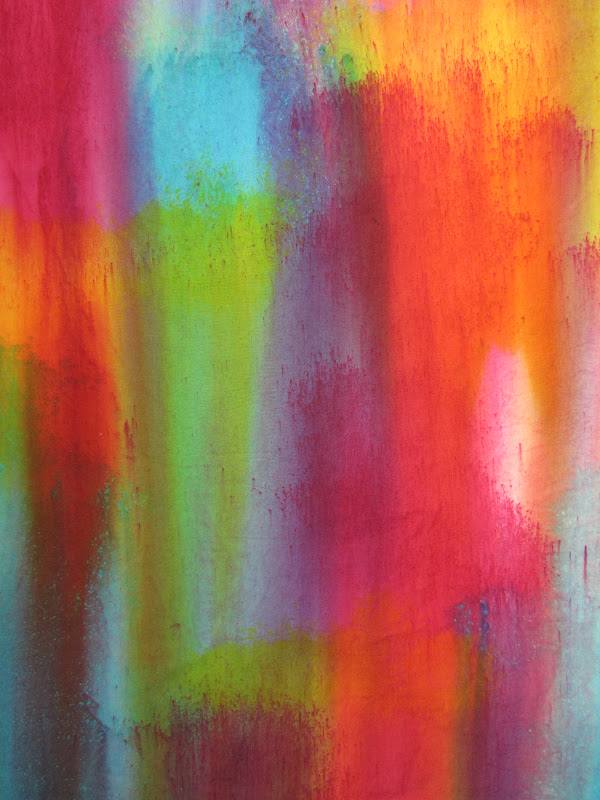
I used a piece of confetti dyed fabric as the base with avocado green for the sashing. It was fun to do and I really enjoy combining different techniques into each piece.

What are your favorite techniques to combine?


Monday, July 2, 2012

Dying Techniques X 3!


I live in New England where we enjoy 4 seasons and decided to create a series of season inspired fabrics. I've never been one to seek out solid colored fabrics so I thought about what techniques I could use for the end result to be colorful and unique. I decided to do a study comparing confetti dying to ice cube dying using the same colors. In corresponding with Carol Ludington she wondered what would happen if ice cubes were added to the confetti style so this was the perfect opportunity to find out!

Below are my winter, spring, summer and fall fabrics. The first fabric photo will be the confetti dying technique, the second fabric shown will be ice cube dying and the third photo will be a combination of the two. Let me know which technique you like the best!

Winter
Creating the feeling of a cold and grey New England day proved to be challenging

Spring
After the long winter months the lively spring colors are a treat!

Summer
The heat and humidity in the summer can feel pretty intense

Fall
Fall in New England is special time with the foliage changing into
the most interesting colors!