
At a recent SAQA meeting I met fellow fiber artist Carol Ludington. She was so enthusiastic about the results of her dying with ice cubes that I needed to learn more! Carol was kind enough to share her knowledge with me (taken from an article in Quilting Arts Magazine) and very supportive of my desire to learn. Let me return the favor by sharing our combined ideas and results.
 |
| Soak fabric in warm water and soda ash for about 30 minutes to prepare the fabric for dying. Fold or scrunch fabric into a bucket. |
 |
| Place a layer of ice cubes on the top of the fabric |
 |
| Sprinkle a layer of powdered fabric dyes over the top of the ice cubes. Choose whatever colors appeal to you - think about how the colors will mix and what secondary color you might get. |
 |
| It's really hard but you'll need to wait for 24 hours... you can peek but you can't touch! |
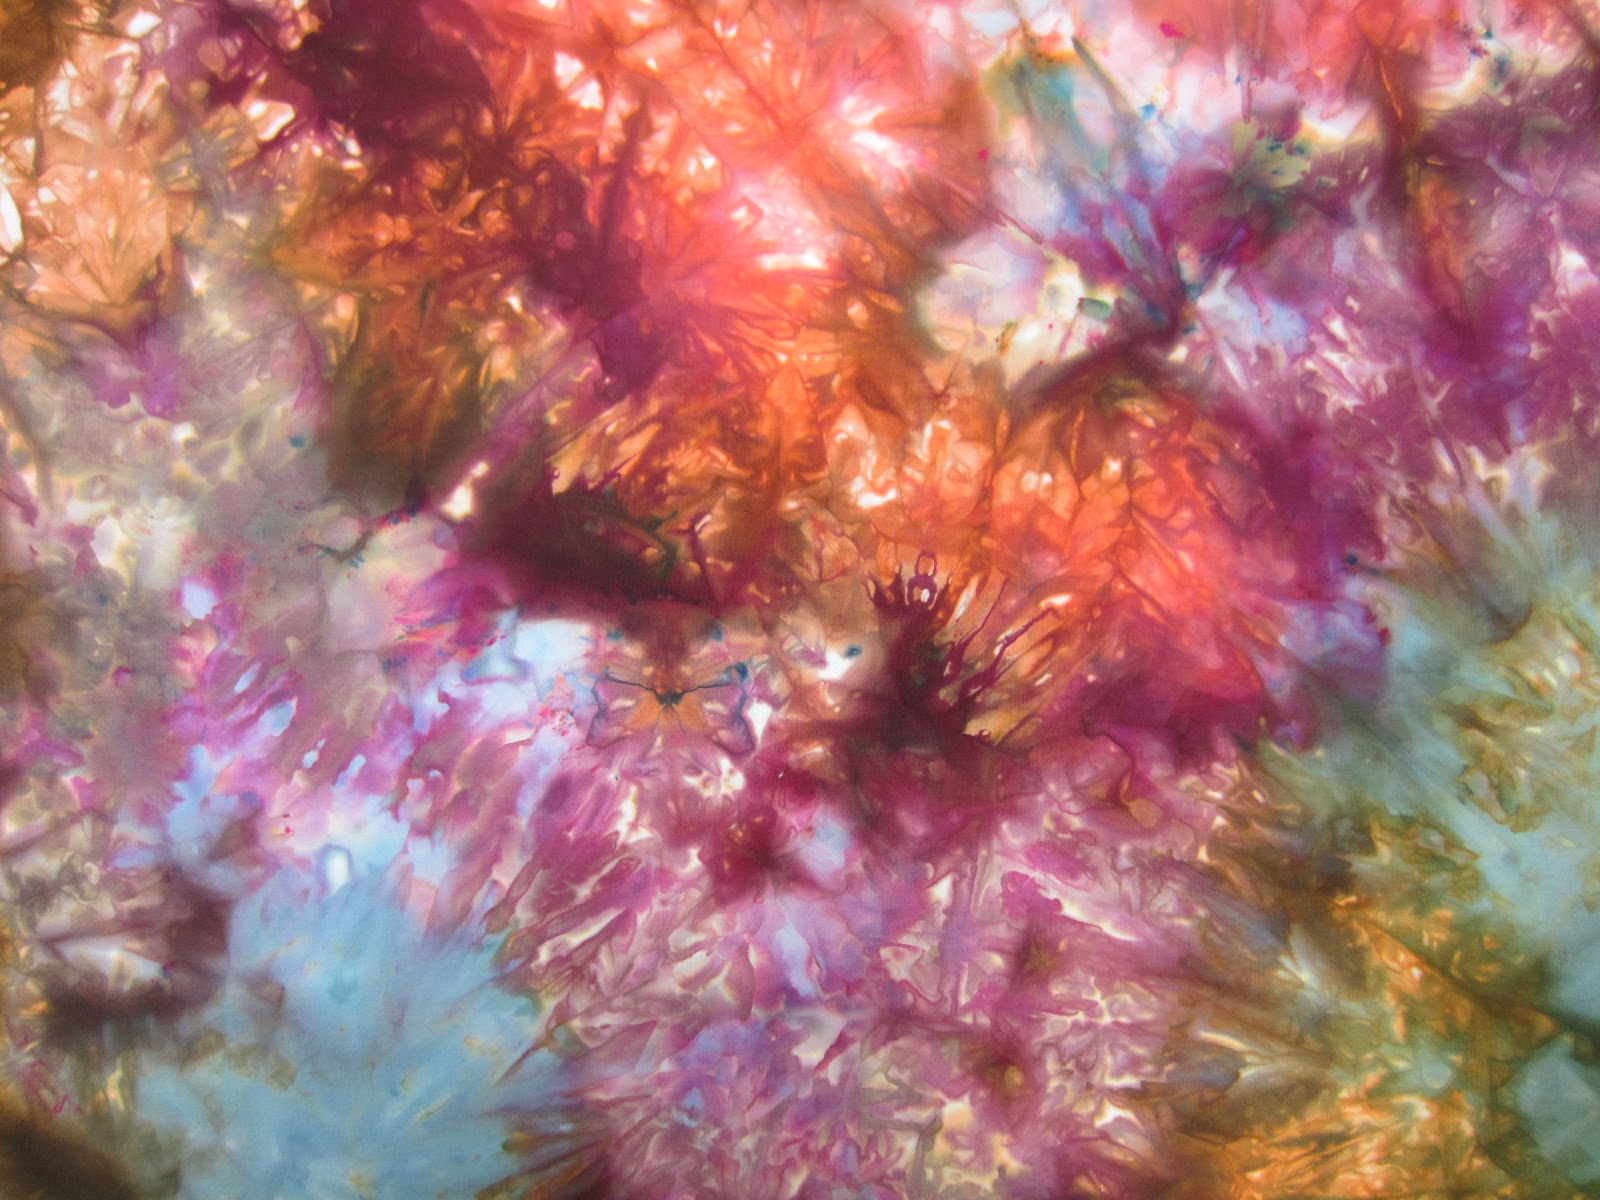 |
| It was soooo worth the wait! Once the 24 hour period was up I rinsed the fabric in cold water until the water ran clear. Next I tossed the fabric into the washer with hot water and Synthrapol. |
 |
| Here are two more pieces of cotton. The piece on the right was put into the bucket first. I layered the ice cubes and powdered dyes. Next I placed a second piece of cotton on top of the ice cubes and dye and repeated the process. The bottom piece defiantly had deeper colors but I love them both. I also dyed silk and silk gauze with great results. |
Oh, they are so fabulous!!!! Nice work. I'm glad you had a great time ice cube dyeing. Did you by any chance use the MX dye powder for the silks???? Would love to try it.
ReplyDeleteCarol L.
I did some overdying with a blue/yellow piece that I wasn't crazy about. I wrapped rubber bands around some whiffle balls and dripped dye on them. I used marigold and purple - loved the results! The pictures were a little muted so I didn't upload. I used the fiber reactive dyes I had on hand. Some were from Dharma and some were from PRO Chemical. They are both good for natural fibers so give it a go with the silk! I'm going to try my luck at nuno felting with the silk!
ReplyDeleteI did this yesterday. I wasn't sure how it would turn out. At first look I was very unsure of the success of the dying. The bottom of the pan had this yucky dark water and I thought "Oh that's not pretty". I was thrilled this morning when I rinsed the fabrics.
ReplyDeleteCher Hurney
Cher - I'm so glad you tried the technique and delighted you were happy with the results! It's such a surprise when you start rinsing... I'd love to see pictures!
DeleteI just discovered your site while searching for dyeing information. Your fabrics are amazing! I adore your color work. I'll be back often.
ReplyDeleteThanks! I checked out your site and have become a fan!
DeleteHi, here I am again after two comments elsewhere on your blog... I was actually looking for this ice dying bit as I got your address off facebook through another site I belong to (Sew News). Someone had seen your work & put up a post of the ice dying... I just had to come over & have a look, see..... Right now it is winter here in Australia & so things take a little longer to dry outside, but I am going to give it a go.... I'll just where thick rubber gloves & rug up a bit more. I hope you like my other comment I left here about using the confetti idea.
ReplyDeleteAnyway, when I do venture outside & have a go with the ice, I'll let you know how it goes.
Thank you SO much for the info,
Regina
Awesome! I hope you try and PLEASE share your photos! You can ice dye inside so no need to get out into the chilly air! I wash and dry my fabrics in the machine... no worries!
DeleteWhat size is the fabric you did? Is this in a 5 gallon bucket? I'm working with cotton cloth diapers and (29x29in) and tried with a 5 gallon bucket and with a much smaller bucket. I seem to get the same effect. Looks like I've "scrunched" it, just like with regular tie dye. Also, do you rinse it in the bucket or take it out to rinse? I'm just worried about the darker colors overtaking the lighter colors at the last minute.
ReplyDeleteHi! I used 1 yard pieces of fabric in a 2.5 gallon (approximately) container. I rinse the fabric in the sink. I understand the worry about the fabric sitting in the muddy colors but there is a point where the fabric won't accept any more dye but just to be sure I put an upside down bowl in the bottom of the bucket to keep the fabric from sitting in the mud for too long! I'd love you to send photos :)
ReplyDeleteOh Carol, what wonderful info. Thanks so much for sharing. I'll be trying as soon as I use up the purple orchid blooms the florist didn't want (lots of them).
ReplyDeleteLet me know how it turns out!
DeleteI put my scrunched fabric in a plastic colander sitting on a small upside down bowl in a container large enough to catch drips
ReplyDeleteSweet! I too use an upside down bowl to place the scrunched fabric! I've never thought of a colander... that sounds like it might have an interesting affect on fabric placed below!
DeleteThanks - I would love to see pictures of your work :)
Best,
Carol
yet another project for my to do list!!! these are super awesome -- thanks so much for the tutorial.
ReplyDeleteJanice
fabric world