Carol R. Eaton Designs
FABRIC FOR SALE: click on pages below!
Showing posts with label Snow Dyeing. Show all posts
Tuesday, January 22, 2019
January = Snow Dyeing Fun!
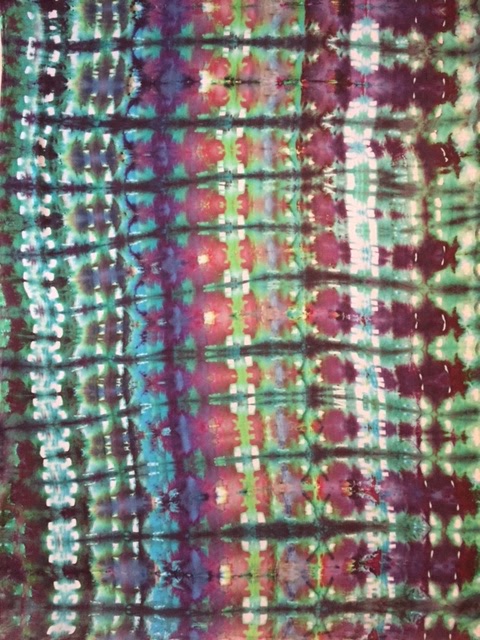
Looking out my windows I can see the beautiful snow capped Rockies. They are breathtaking to view especially with a bright blue sky to make them pop visually! We've had multiple mini snowstorms in my town which gives me lots of inspiration for getting out to dye with snow. Usually when I dye it's a very free and unplanned session. This time I took a more methodical approach by pressing and clamping the fabric before I soaked in soda ash and water. I have to say I'm happy with the results and admit there is something positive to be said for the concept of planning in advance!
Wednesday, May 3, 2017
Last Call for Snow Dyeing!
I was delighted for the late spring snow fall in the Denver area! It gave me a chance to get some snow dyeing done for the first time since moving to CO.
| I love using clamps to keep the fabric folded tightly which creates lovely designs! |
| In addition to clamps I use plastic balls & rubber bands for another type of look! |
| Snow is piled up and dye scattered about - now the waiting begins! |
Time for unfolding and the big revile!
Tons-O-Fun!
Monday, January 25, 2016
10" of Fresh Snow = Snow Dyeing Fun!
Finally we got a dumping of snow! It's already late January and I thought this snowfall would never get here... but it came and I'm all smiles! The studio is now geared up to dye as much as possible while the snow lasts... the meteorologist say rain tomorrow.
Check out these easy steps for your own snow dyeing experiments!
![]() |
| If you live in snow country you just have to try this! |
![]() |
| This piece was folded and clamped. |
![]() |
| This snow burst effect is from placing recycled containers under the fabric! |
![]() |
| Here is another piece folded and clamped. |
![]() |
| These snow bursts were created using whiffle balls tied into the fabric. |
![]() |
| This final piece was made by slipping old hotel keys into the folds of the fabric and clamped. |
Let me know how your snow experiments come out... what did you learn... what will you try again... what won't you try again!
Sunday, March 22, 2015
Snow + Folds + Clamps = Cool Designs!
Just for fun I folded and clamped the fabric before topping with snow! I shook dye powder over the surface of the snow and walked away. Once the snow melted I washed the fabric and voila - kinda fun!
Tuesday, March 17, 2015
My Snow Bursts Are Getting Larger!
The snow bursts on my latest fabric range from 11" - 17" across! It all depends on what I pull from the recycling bin - the larger the elevated surface the larger the snow burst. The way the colors meander together is knocking me out - I love color! For my next challenge I will try to reduce the size of the snow bursts... gotta hurry up as the spring rains are here and eating up the snow!
Monday, February 23, 2015
Oh Glorious Snow... You Are Still Here!
The Northeast had a slight reprieve from the bitter cold jet stream this weekend. With 4" of fresh snow and the temperature creeping up into the 30's playing in the snow was a pleasure!
I didn't take any process photos this session but here is the clean up... phew!
The clean up photo actually allows you to see what I pull from the recycle bin to create the "snow burst" design. In general any item you place underneath the fabric to elevate it will give you a lovely design. In this session I used the same size containers (on the left) but if you vary the sizes the design is even more interesting... give it a try and remember it's impossible to make a mistake!
This weekend's finished pieces!
![]() |
| This is a detail from one of the snow burst centers |
![]() |
| This is the full piece at 2 yards |
![]() |
| Here is another detail of the snow bursts |
![]() |
| These tea towels are much less dramatic but I made them for my 25 year old son who is in need of kitchen supplies (according to his mother!) |
![]() |
| This is a second 2 yard piece |
![]() |
| Although more mellow the snow bursts are still kinda cool |
![]() |
| Here is the final snow burst to share! Let me know if you try the technique! |
Friday, February 20, 2015
Snow + Clamps + CD's = More Cool Designs!
OK - I'm totally hooked on experimenting with snow and manipulating the fabric for unexpected results! Although using CD's as a resist when dyeing fabric is not new it was a little unusual when dyeing with snow.
The challenge with snow is to ensure enough moisture and dye reach into the center of the clamped fabric. I've resorted to stuffing it into nooks and crannies as it melts!
I'll keep experimenting until I get this technique down... I love how the colors migrate across the fabric but I need to get a more consistent pull throughout the piece. I believe I also need to change up the tub I'm dyeing in. Something with less depth might help with the coverage... to be continued!
Have you tried this yet? What were your results?!
Wednesday, February 18, 2015
Snow + Clamps + Dye = Awesome Designs!
I waited for it to warm up from -10 to about 5 degrees before venturing out to collect snow for dyeing! Baby it's cold in Connecticut right now... but I digress! With this challenging weather comes an abundance of snow to dye with and for that I am grateful!
I'm still experimenting with clamps. I wasn't sure how the snow dyeing technique would work with clamps but they are too fun not to give them a try!
I still have some fiddling to do when it comes to how to position the snow on top of a clamped piece for optimum dye coverage.
Here is a detail of the multicolored piece. The yellow and orange was a nice pop next to the violet.
In this piece I used only black for color. I wanted to be sure the dye had decent coverage so after the snow melted I scooped some of the dye at the bottom of the tub and poured it over the fabric.
Next I'll try clamps and CD's to see what kind of design I can come up with! Do you have any tips to share?! I'd love to learn more...
I'm still experimenting with clamps. I wasn't sure how the snow dyeing technique would work with clamps but they are too fun not to give them a try!
I still have some fiddling to do when it comes to how to position the snow on top of a clamped piece for optimum dye coverage.
Here is a detail of the multicolored piece. The yellow and orange was a nice pop next to the violet.
In this piece I used only black for color. I wanted to be sure the dye had decent coverage so after the snow melted I scooped some of the dye at the bottom of the tub and poured it over the fabric.
Subscribe to:
Posts (Atom)