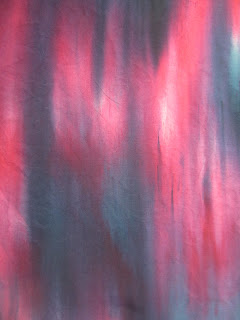
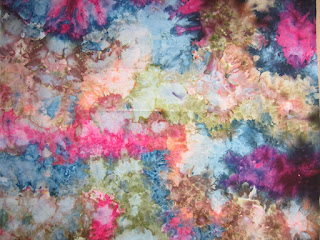
I started with some ice dyed fabric but it wasn't quite woodsy enough... back into the dye bucket for another round of ice and dye. I was happier with the over dye and it seemed to pair nicely with solid black. The runner is off in the mail and I hope she enjoys it...
Carol R. Eaton Designs

FABRIC FOR SALE: click on pages below!
Showing posts with label Ice Cube Dying. Show all posts
Showing posts with label Ice Cube Dying. Show all posts
Wednesday, September 4, 2013
Ice Dyed Table Runner
My sweet young friend Lindsey recently got married and I wanted to create something for the happy couple! Lindsey and I share a need for practicality so I wanted to make something that was useful but not cumbersome to move around as newlyweds tend to do. We also share a love and respect for nature so I wanted to dye the fabric in woodland colors.
I started with some ice dyed fabric but it wasn't quite woodsy enough... back into the dye bucket for another round of ice and dye. I was happier with the over dye and it seemed to pair nicely with solid black. The runner is off in the mail and I hope she enjoys it...
I started with some ice dyed fabric but it wasn't quite woodsy enough... back into the dye bucket for another round of ice and dye. I was happier with the over dye and it seemed to pair nicely with solid black. The runner is off in the mail and I hope she enjoys it...
Wednesday, October 17, 2012
Ice Dyed Fabric: Autumn Inspiration
Yesterday I pulled my dye immersed fabrics from the dye pots and today I pulled out the ice dyed fabrics. Once again I was influenced by the beautiful autumn colors from my recent trip to Vermont. The ice dyed results are always a surprise when the fabric comes out of the pot. I have no real way to determine how the colors will migrate because they are controlled by the way the ice melt flows.
Here are the results:
I see a piece of art with colorful leaves floating
all around in my future!
 |
| Brown and Red If I were Goldilocks I would say this one was just right! |
 |
| Orange, Yellow and Brown Hard to believe there was orange used! |
 |
| Orange, Yellow and Green Again, the orange or lack-of was a surprise! |
 |
| Red and Gold For me the red was a little too bright and I'll try again with more gold |
Tuesday, October 16, 2012
Mixed Media: Dragonfly
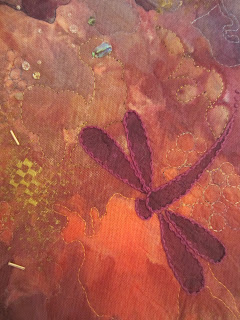
"Dragonfly" is a 10" X 21" piece I created by combining a few different methods. I started with a white piece of artists canvas which I dyed using the ice dye technique. I started quilting by meandering in-between and over the various colors... basically I wandered wherever the canvas seemed to need some texture. I wasn't quite satisfied so I started stamping with gold ink... still feeling it needed more I added crystals and beads. I put the piece away for a while and when I came back to it I knew it needed purple a dragonfly... or two! The canvas is stretched over a wooden frame. It was fun to create!
Wednesday, September 26, 2012
Fabric Dying and Manipulation!
I had a wonderful weekend experimenting in my studio! I created 10 yards of iced dyed or confetti dyed fabrics as well as about 4 yards of manipulated fabric using the discharge method. I had a few "duds" and some "yeahs" which are both good for learning and growing. Of course we all want to be enamoured which each piece but when the fabric doesn't turn out as planned you learn something about the process that can be applied to the next project. Perhaps the "duds" are just not quite finished yet... I'll keep working on them. Maybe I'll discover a new technique by not giving up?!
Here are some fun pieces; my focus was on color combinations.
 |
| Confetti Dying: Cobalt Blue & Fuchsia |
 |
| Confetti Dying: Blue (only one color used) |
 |
| Confetti Dying: Blue & Yellow |
 |
| Confetti Dying: Blue, Red & Yellow |
 |
| Iced Dying |
 |
| Iced Dying |
 |
| Iced Dying |
 |
| Discharge |
Sunday, September 16, 2012
How to use Iced Dyed Fabric: Geranium
I'm focused on creating designs using my "iced dyed" fabrics and completed "Geranium" over the weekend. The iced dyed fabric can be very busy and it's been fun determining what prints will go with each other... most are SO BOLD... love them!
.JPG) |
| "Geranium" is stretched over canvas stretchers similar to a painting and can be easily hung like a picture. |
 |
| This photo shows the stitching and bead details. |
Tuesday, September 11, 2012
Favorite Dying Techniques: Iced Dying and Confetti Dying!
I had time to get back to my dye pots over the weekend and couldn't decide which technique to use so I chose a couple of my favorites! The first two photos are iced dyed cotton and the bottom two photos are confetti dyed fabrics.
 |
| Iced Dyed Cotton I combined orange, violet and green |
 |
| Iced Dyed Cotton I combined lavender with gray |
 |
| Confetti Dyed Cotton I first shook bronze dye powder and two shades of yellow over the fabric and added liquid green dye |
 |
| Confetti Dyed Cotton I combined dry dye powder with liquid dye. I brought the fabric to a CFAC workshop where I added Dye-Na-Flow dyes for a variation of color |
Wednesday, May 30, 2012
Ice Cube Dying - A Desire for Burgundy!
I was trying to create a Burgundy color which would have been easier using the typical dye immersion method. However, you know I'm hooked on ice cube dying so I thought I'd give it a go. I combined green, black and red with the idea that it wouldn't exactly be a solid color. Also I wasn't exactly sure how much of the colors would even blend.
Here are the results:
The colors are hard to capture on the computer but "live" the piece is very deep with bright, contrasting rich colors. I'm learning that the more contrast in color choices the more dramatic the ice cube method results are!
Monday, May 28, 2012
4 Techniques!
Q: How can you tell when the fabric done?
A: When it feels right!
I started with ice cube dying but it was a little pale. I added confetti dying using blue but it still needed more. I went in the yard and picked some leaves and ferns. Using silk screen ink I stamped the natural leaves onto the piece... but it wasn't quite finished. Lastly I took some yellow and orange paint and added some here and there.
Finally, it felt right!
 |
| I'm thinking a large single dark flower might work with this as the background fabric... what would you do with it?! |
Wednesday, May 23, 2012
Combining Ice Cube Dying with Fabric Paints!
I dyed about 6 yards of fabric over the weekend using the ice cube method. I usually dye in old round pails ... really old! They're getting pretty beat up so when I spied some fun rectangle shaped containers at a tag sale I scooped them up. I discovered they're perfect with one exception; they are larger than my old pails so 1-yard fabric pieces don't quite take up the full volume of the container.
When I removed the fabric from the dye bath there was more white space than I expected because of the container size; the dye didn't get a chance to meander all over the fabric. The fabric was still nice - just different. Some pieces I left alone but some pieces needed more color. Rather than using more dye I decided to pull out my fabric paints from Dharma Trading. I was happy with the results and liked the combinations of techniques.
When I removed the fabric from the dye bath there was more white space than I expected because of the container size; the dye didn't get a chance to meander all over the fabric. The fabric was still nice - just different. Some pieces I left alone but some pieces needed more color. Rather than using more dye I decided to pull out my fabric paints from Dharma Trading. I was happy with the results and liked the combinations of techniques.
Give it a try!
 |
| Using one of my favorite stamps I added color randomly to fill in some (not all) of the white spaces. |
 |
| You'll need to dry and heat set the paint. |
 |
| The completed piece looks more interesting with the paint and the gold shimmer adds some fun! |
Thursday, May 10, 2012
Comparing Dying Techniques
I continue to be excited by surface design and at this point I'm starting to take a more focused approach to my sessions. In this segment I wanted to compare 3 different techniques using the same colors just to see how they would compare to each other. My examples are below; you'll compare confetti dying, ice cube dying and then the typical dye immersion method. This was a good learning experience and each time I dye I discover something new!
I hope you enjoy the results. I found it amazing that the same colors were used because the results were so different. I have a favorite method but I won't say anything so you can take a look and make your own decisions!
I hope you enjoy the results. I found it amazing that the same colors were used because the results were so different. I have a favorite method but I won't say anything so you can take a look and make your own decisions!
The colors used below are yellow and wet sands
 |
| Confetti Dying - Yellow & Wet Sands |
 |
| Ice Cube Dying - Yellow & Wet Sands |
 |
| Dye Immersion - Yellow & Wet Sands |
The below fabrics combine Blue, Red and Yellow
 |
| Confetti Dying - Blue, Red & Yellow |
 |
| Ice Cube Dying - Blue, Red & Yellow |
 |
| Dye Immersion - Blue, Red & Yellow |
The below colors are Yellow and Red
 |
| Confetti Dying - Yellow & Red |
 |
| Ice Cube Dying - Yellow & Red |
 |
| Dye Immersion - Yellow & Red |
Tuesday, April 17, 2012
More Dying and Painting on Fabric!
I know I said I wouldn't start any new projects until my design wall was cleared but a girls gotta let loose! Last weekend I couldn't resist experimenting with two controlled groups. One dye bath used ice cubes and one dye bath used the typical dye/water mixture - same colors. Although I enjoyed both results the ice cube dying causes the colors to intermingle in such an unusual way - almost like watercolors. I have to say it continues to be my favorite method! For the record I've almost cleared my design wall; there is one more piece to complete and then my conscience is clear!
Below are results from the ice cube dying! If you haven't tried it you
really need to give it a go...
Thursday, March 8, 2012
Over Dying
Sometimes the end result of my dyed fabric isn't quite what I had in mind or it feels like it's missing something. Once I cure my fabric I start over with fresh eyes and decide if I should dye or paint over the original colors. Below are a few fabrics I decided to dye again - it's such a freeing expereince to add more layers!
 |
| I used whiffle balls and clips and poured more dye over the tops |
 |
| I wonder what the creator of the whiffle ball would think! |
 |
| Here I folded the fabric adding clips and rubber bands |
 |
| It's a surprising look |
 |
| I used the lid to a jar securing it with a rubber band |
 |
| This outcome was the biggest surprise to me! |
Subscribe to:
Posts (Atom)


